
In this article, we will look at how to access memory while following the startup process in the IDE.
Here is the development environment at the time of posting.
PC: Windows 10 OS
IDE: STM32CubeIDE Version1.3.0
Board: STM32Nucleo-F401RE
Let’s start up a project in the IDE and see how the startup process works.
Here we will use the F401mbedBase project that we created earlier.
Looking at the datasheet, the memory map of this microcontroller is as follows.
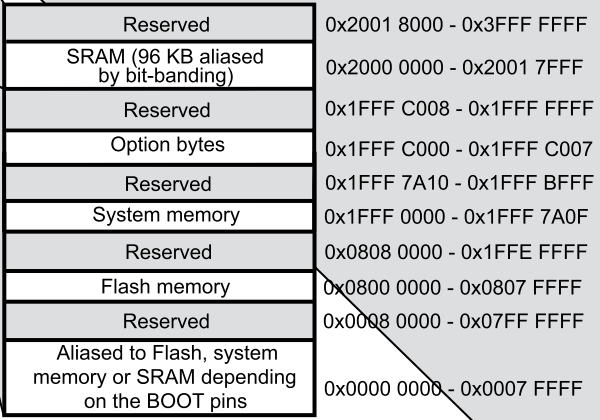
Flash: 0x8000000 – 0x807FFFF
SRAM: 0x20000000 – 0x20017FFF
Keep this in mind.
Open F401mbedBase/Core/Startup/startup_stm32f401retx.s in Project Explorer by double-clicking on it.
This is an assembler source file.
On line 77, we have Reset_Handler:
On line 78, it says ldr sp, = estack
Put a breakpoint at line 78 and start Debug.
Run – Resume and it stops at line 81.
If I put a breakpoint on line 78, it stops when it finishes executing the instruction on line 78.
Line 78 assigns the value of the stack to the register sp, which is called the stack pointer.
Now select Window – Show View – Registers.
> Click on the > in General Registers to expand it.
If you look at the value (Value) of sp, you will see that it is 0x20018000.
Since sp is initially set to the value of the last + 1 location in RAM, we know that it matches the memory map.
If the value is displayed in decimal, you can right-click on value and select Number Format – Hex to display it in hexadecimal.
Also, if you look at the value of pc, you will see that it is 0x8005084
The pc is a register called the program counter, which contains the address to execute the program.
Now select Window – Show View – Disassembly.
This will allow you to see the disassembled code.
In this case, the movs r1,#0 part is displayed as it is, because that was where the assembler code was originally written.
However, the address will also be displayed to the left of it.
08005084: movs r1,#0
You can see that the value of pc and the address are the same.
That’s because the program is stopped here.
A little above that
Reset_Handler:
08005080:
is written a little above it.
Now select Window – Show View – Memory Browser and enter 0x8000000 in the combo box.
The Memory Browser will allow you to view the contents of the specified address.
This will be the first address of the Flash memory that comes up.
The program will run from here.
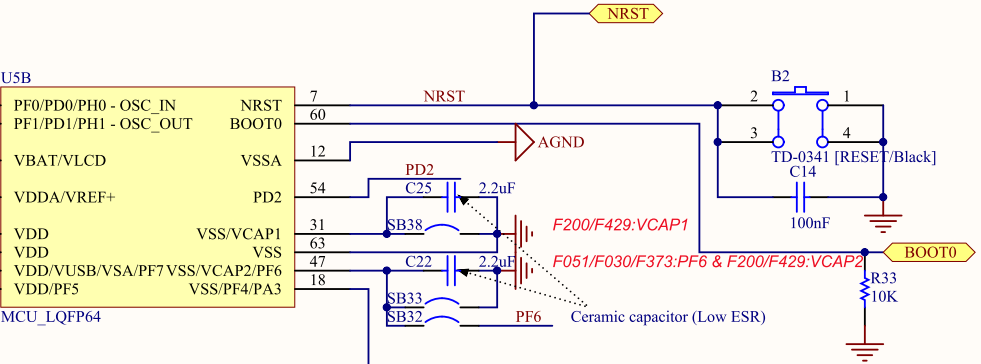
If you look at the schematic, you will see that the BOOT0 pin is pulled down to GND.
And the reference manual (RM0368) contains the following table
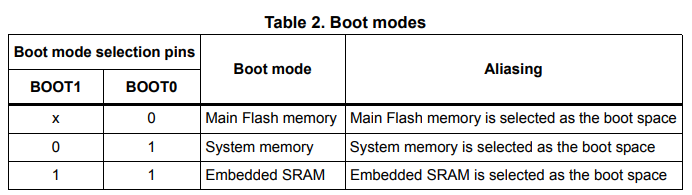
From the above, we can see that this microcontroller starts working at 0x8000000.
When designing the circuit, most probably the Boot0 pin will be connected to GND.
In the schematic, it is pulled down with a resistor and connected to the connector, but there may be a way to connect it to the GPIO port for operation.
This is a bit of a digression.
In ARM Coretex-M, the first 4 bytes from the top of this flash are used as the initial address of the stack.
In the ARM Coretex-M, the first 4 bytes from the top of this flash are the initial value of the stack, and the next 4 bytes are the reset handler.
Since we’re on a bit of a tangent, let’s take a look at the Memory Browser.
0x08000000 20018000 08000581 … …
20018000 is the value to set for sp.
And 08000581 is the value of the reset handler.
Oh, wait a minute. In the previous
Reset_Handler:
08005080:
and the address is off by one. What is this?
I’ll leave the difficult part to others and just give you an overview.
ARM microcontrollers have ARM instructions and Thumb instructions.
ARM has 32-bit instruction length, but there are more instructions that can be handled with 16-bit length because they are not needed so much. That is Thumb.
The least significant bit seems to be there to determine which instruction is the branch destination code.
So, in effect, the least significant bit as an address should be considered 0.
I have referred to here.
The instructions are easy to remember.
Thumb (thumb) is not even half of ARM (arm). Who named it that (laughs)?
I’ve digressed again.
That’s how the process starts from Reset_Handler after the initial value of the stack is set to the stack pointer.
If you look a little further down in the assembler source file, you will find bl main.
bl is a branch instruction. So this is where main() starts.
Let’s review.
In Disassembly, you can see the disassembled code, and you can also check the address.
In the Memory Browser, you can check the contents of the specified address.
The Memory Browser is for viewing only, but the Memory Window allows you to rewrite the value of the specified RAM address.
Why don’t you try it out?


