
In this issue, we will look at debuggers.
Nowadays, it is common to have a debugger on a microcontroller board.
A while ago, I found out about a debugger called STLINK-V3MINI.
I think it is similar to the debugger on the Nucleo board, but I tried to connect it to my PC to see if it worked.
Here is the development environment at the time of posting.
PC: Windows 10 OS
IDE: STM32CubeIDE Version1.3.0
Board: STM32Nucleo-F401RE
Debugger: STLINK-V3MINI
Overview of the work
The Nucleo board has both a microcontroller and a debugger, so I separated the debugger from the microcontroller and connected an external debugger (STLINK-V3MINI) to the microcontroller to see if the IDE would work. I disconnected the debugger and connected an external debugger (STLINK-V3MINI) to the microcontroller.
Three features of the STLINK-V3MINI
Fast!
It is much faster than the previous version, V2.
V3 is 480Mbps compared to V2’s 12Mbps.
It seems to work well when downloading large files.
Cheap!
I think it was about (Japanese) 1,200 yen.
Cute
The connector has a narrow pitch so it saves space, and it’s small and cute.
At least it’s much cuter than WWDG, which is a dog who doesn’t want to be heard.
Disconnecting the debugger
You can separate the microcontroller from the debugger on the board by removing the two jumper pins that are attached to CN2 by default.
It’s easy.
Just make sure you don’t “snap” the board or anything.
Connecting the STLINK-V3MINI
We will use the SWD interface, which requires even fewer pins than the JTAG interface.
SWD stands for Serial Wire Debugger.
Connect as shown in the table below.
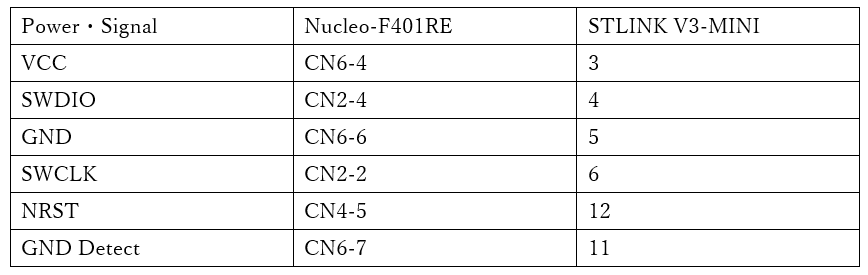
Connect the PC to the Nucleo board with a USB cable, and also connect the PC to the STLINK-V3MINI with a USB cable.
The STLINK-V3MINI should be connected to the USB2.0 MicroB connector.
Start the IDE and download the program
Start the IDE and open a project that contains a program such as the LED blinkey program.
If you don’t have a program to run, you can create one by referring to here.
Run – Debug and you will get the following message.
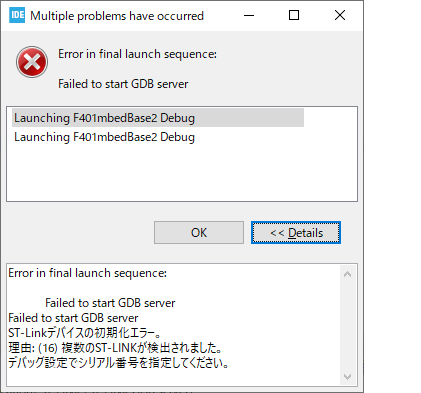
This is an error, but it’s normal.
This is a message that says, “There are two debuggers, please choose one of them” after communicating with the debugging microcontroller on the two boards connected with a USB cable.
So, in Debug – Debug Configuration, in the Debugger tab, check the “Use a specific ST-Link serial number” checkbox and press the “Find” button.
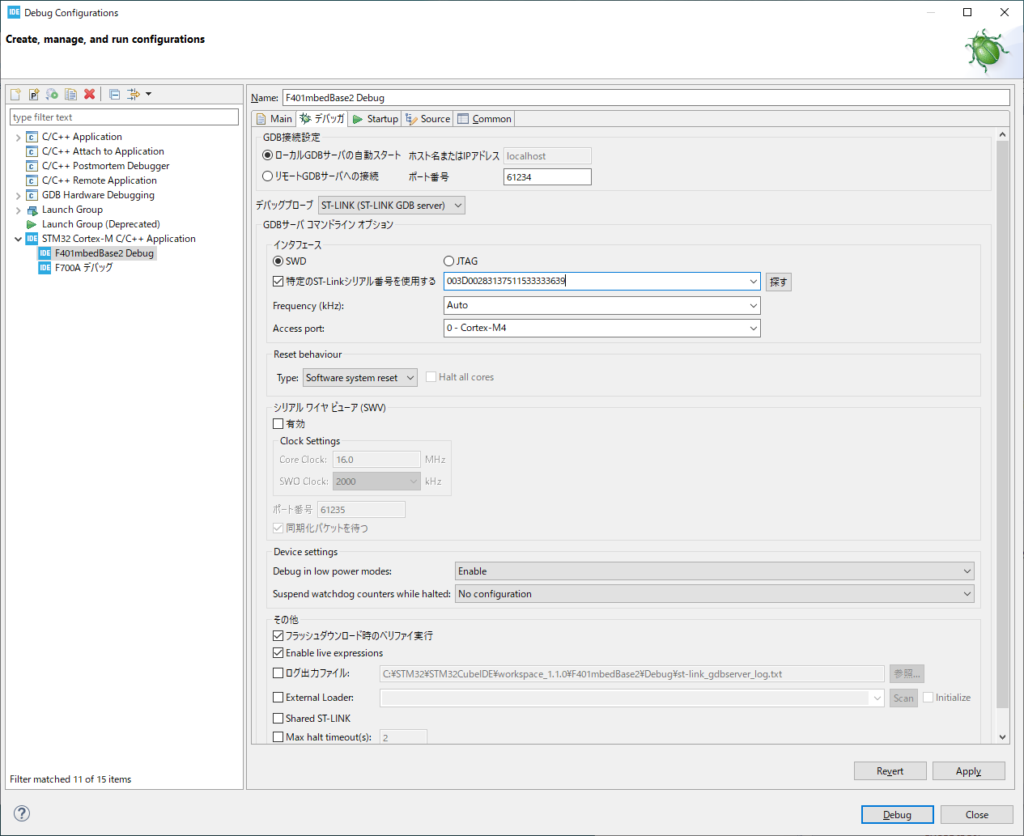
Use the combo box to select one of them.
If you miss, re-select the other one.
But what do you use this for? I mean, if you are going to use the debugger a lot, this is a good choice because it is very cost effective.
You will need it if you want to write programs with several people.
If you buy a lot of Nucleo boards and “snap” them together, you’ll end up with a lot of extra microcontrollers.
This was an introduction to a cute debugger.
I’d like to remind you that I’m not a spy for ST.


