
In this article, we will try to access the uSD card using HAL.
The following is the development environment at the time of submission.
PC: Windows 10 OS
IDE: STM32CubeIDE Version1.3.0
Configurator: STM32CubeMX Version5.6.0
Board: STM32Nucleo-F401RE
Accessing with Mbed
In the previous article Mbed with STM32CubeIDE: SD Card Edition, we showed you how to use Mbed.
In Mbed, the access method is using SPI, but this time, I used SDIO.
The number of connections will increase, but the access time (communication speed) will also increase.
Last time, I used a large SD card, but this time, I tried a micro SD card.
But it’s too small…
No, it’s for eye training.
Prepare the SD card connector
This time I used a micro SD card connector from here.
Please refer to here for handling.
The power supply voltage is 3.3V.
The card detection switch (pins 9 and 10) is not used this time.
Prepare an SD card and a card reader so that you can read it on your computer.
I am afraid it is made in Japan, but I want to blog about the results of checking the operation.
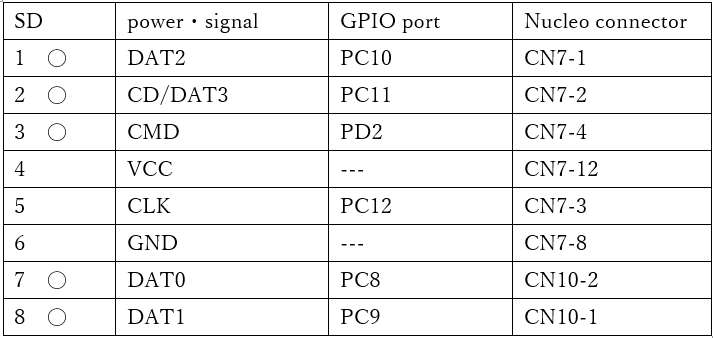
Wiring it up
I connected them as shown below.
The signals marked with zeros, except CLK, should be pulled up to 3.3V.
I saw the ST circuit example and it had 10kΩ, so I matched it.
File System
The file system is FatFS.
Please have a look at UM1721.
I’ll try to run it by referring to the sample in section 5.3 and the FW sample.
Create a project
Start the IDE, select File- New – STM32 Project, when the Target Selection window comes up, select the Board Selector tab, select NUCLEO-F401RE from the Boards List and press Next.
Enter F401SdioHAL as the Project name and press Finish.
When it asks “Initialize all peripherals with their default Mode ? Press Yes.
This kind of project is associated with the STM32CubeMx perspective. Do you want to open this perspective now ? Press Yes.
Configure SDIO in the code generator
Select Pinout & Configuration – Categories – Connectivity – SDIO and press
Select MMC 4bits Wide Bus from Mode in SDIO Mode and Configuration.
Change the SDIOCLK clock divide factor value from 0 to 10 in Parameter Settings.
(0 didn’t work, 5 didn’t work, tried 10 and it worked).
This value seems to be used for SDIOClock = AHBClock / (SDIOCLK clock divide + 2).
This value seems to be used for SDIOClock = AHBClock / (SDIOCLK clock divide + 2). 0 seems to be too fast and does not work, so it needs to be adjusted to an appropriate value.
Next, in GPIO Settings, make sure that the red boxes match the wiring table above.
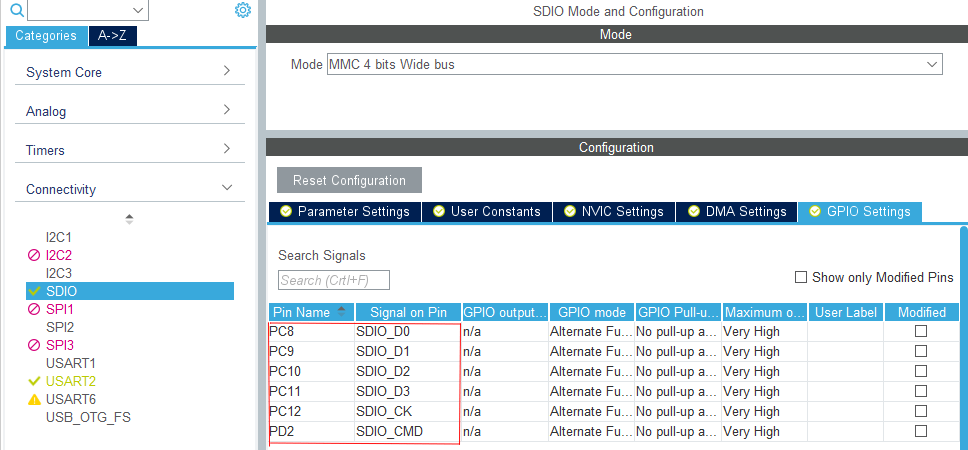
(If they are different, you will have to adjust them)
Now build and copy the following function in main.c and save it.
static void MX_SDIO_SD_Init(void)
{

  /* USER CODE BEGIN SDIO_Init 0 */

  /* USER CODE END SDIO_Init 0 */

  /* USER CODE BEGIN SDIO_Init 1 */

  /* USER CODE END SDIO_Init 1 */
  hsd.Instance = SDIO;
  hsd.Init.ClockEdge = SDIO_CLOCK_EDGE_RISING;
  hsd.Init.ClockBypass = SDIO_CLOCK_BYPASS_DISABLE;
  hsd.Init.ClockPowerSave = SDIO_CLOCK_POWER_SAVE_DISABLE;
  hsd.Init.BusWide = SDIO_BUS_WIDE_1B;
  hsd.Init.HardwareFlowControl = SDIO_HARDWARE_FLOW_CONTROL_DISABLE;
  hsd.Init.ClockDiv = 10;
  if (HAL_SD_Init(&hsd) != HAL_OK)
  {
    Error_Handler();
  }
  if (HAL_SD_ConfigWideBusOperation(&hsd, SDIO_BUS_WIDE_4B) != HAL_OK)
  {
    Error_Handler();
  }
  /* USER CODE BEGIN SDIO_Init 2 */

  /* USER CODE END SDIO_Init 2 */
}
Add FATFS in the code generator
Next, select FATFS from Pinout & Configuration – Categories – MiddleWare.
Under FATFS Mode and Configuration Mode, check the SD Card checkbox.
Then build again.
If you get the following warning window, don’t worry about it, just press Yes.

This is a warning that you have not set up card detection.
We won’t use it this time, so ignore it.
Is this a bug in the code generator?
For some reason, adding FATFS breaks the contents of MX_SDIO_SD_Init().
Make sure that an if statement or two are missing.
So, overwrite it with the code you just saved.
Note that this part will be broken every time you run the code generator.
Coding it
Paste the following code before the while loop in main.c.
Since the code overlaps with MX_FATFS_Init(), comment MX_FATFS_Init().
MX_SDIO_SD_Init();
// MX_FATFS_Init();
  /* USER CODE BEGIN 2 */

  FATFS SDFatFs; /* File system object for SD disk logical drive */
  FIL MyFile; /* File object */ char
  char SDPath[4]; /* SD disk logical drive path */
  static uint8_t buffer[_MAX_SS]; /* a work buffer for the f_mkfs() */

  FRESULT res; /* FatFs function common result code */ static
  uint32_t byteswritten, bytesread; /* File write/read counts */
  uint8_t wtext[] = "Hi, this is STM32 working with FatFs"; /* File write buffer */
  uint8_t rtext[100]; /* File read buffer */

  /*##-1- Link the SD disk I/O driver ########################################*/
  if(FATFS_LinkDriver(&SD_Driver, SDPath) == 0)
  {
    /*##-2- Register the file system object to the FatFs module ##############*/
    if(f_mount(&SDFatFs, (TCHAR const*)SDPath, 0) ! = FR_OK)
    {
      /* FatFs Initialization Error */
      Error_Handler();
    }
    } else
    {
      /*##-3- Create a FAT file system (format) on the logical drive #########*/

      FRESULT fr;
      fr = f_mkfs((TCHAR const*)SDPath, FM_ANY, 0, buffer, sizeof(buffer));
      if (fr ! = FR_OK)
      {
    	Error_Handler();
      }
      } else
      {
        /*##-4- Create and Open a new text file object with write access #####*/
        if(f_open(&MyFile, "STM32.TXT", FA_CREATE_ALWAYS | FA_WRITE) ! = FR_OK)
        {
          /* 'STM32.TXT' file Open for write Error */
          Error_Handler();
        }
        } else
        {
          /*##-5- Write data to the text file ################################*/
          res = f_write(&MyFile, wtext, sizeof(wtext), (void *)&byteswritten);

          if((byteswritten == 0) || (res ! = FR_OK)))
          {
            /* 'STM32.TXT' file Write or EOF Error */
            Error_Handler();
          }
          } else
          {
            /*##-6- Close the open text file #################################*/
            f_close(&MyFile);

            /*##-7- Open the text file object with read access ###############*/
            if(f_open(&MyFile, "STM32.TXT", FA_READ) ! = FR_OK)
            {
              /* 'STM32.TXT' file Open for read Error */
              Error_Handler();
            }
            } else
            {
              /*##-8- Read data from the text file ###########################*/
              res = f_read(&MyFile, rtext, sizeof(rtext), (UINT*)&bytesread);

              if((bytesread == 0) || (res ! = FR_OK)) /* EOF or Error */ (res !
              {
                /* 'STM32.TXT' file Read or EOF Error */
                Error_Handler();
              }
              } else
              {
                /*##-9- Close the open text file #############################*/
                f_close(&MyFile);

                /*##-10- Compare read data with the expected data ############*/
                if ((bytesread ! = byteswritten))
                {
                  /* Read data is different from the expected data */
                  Error_Handler();
                }
                } else
                {
                  /* Success of the demo: no error occurrence */ Error_Handler(); }
                }
              }
            }
          }
        }
      }
    }
  }

  /*##-11- Unlink the SD disk I/O driver ####################################*/
  FATFS_UnLinkDriver(SDPath);

  /* USER CODE END 2 */
Build and run
Build and step through the code line by line to make sure there are no errors.
If it can be executed to the end without being hit by Error_Handler(), it is a success. I think so.
Let’s take a look at the contents of the uSD card in the card reader.
If you see a file called STM32.TXT and the contents are as follows, you have succeeded.
Hi, this is STM32 working with FatFs
How did it go?
I hope you were able to write successfully.


