今回はタイマーのサンプル timer_group を動かしてみます。
この記事は JTAG でデバッグすることを前提にして書いています。
環境構築については こちら をご覧になってください。
投稿時の開発環境を記しておきます。
PC:
Windows10 OS
開発ボード :
ESP32-DevKitCーVE
(Soc : ESP32-D0WD-V3)
デバッガー(H/W):
FT2232D
デバッガー (S/W) :
Visual Studio Code + PlatformIO + ESP-IDF Framework
プロジェクトをつくる
使っていたプロジェクトを開いていたら、File – Close Folder して閉じておきます。
その後にVSCodeからPlatformIOをOpenします。
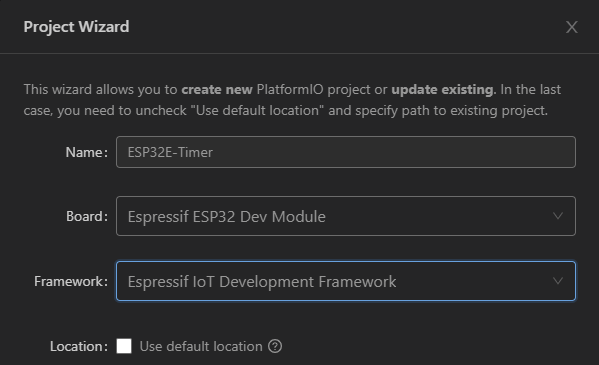
以下の内容でプロジェクトを新規に作成します。
Name : ESP32E-Timer
Board : Espressif ESP32 Dev Module
Framework : Eresspsif IoT Development Framework
Name : ESP32E の “E” は Framework (Espressif IoT Development Framework)の頭文字を示しています。
(後から見てわかるように、ESP-IDFを使うことを明示しています)
platformio.ini に以下の3行を追加して、 Ctrl + s で保存しておきます。
COM[4]の4の部分はデバイスマネージャーのポート(COMとLPT)で Silicon Labs CP210x から始まるCOMの番号を記述します。
debug_tool = minimodule
upload_port = COM[4]
monitor_speed = 115200
タイマーのAPIリファレンスとサンプル
タイマーのAPIは こちら を参照してください。
サンプルプログラムは こちら を参考にしました。
PlatformIOで Eresspsif IoT Development Framework を選択したことにより、以下のローカルフォルダからも参照可能なはずです。
C:\Users\xxxxx\.platformio\packages\framework-espidf\examples\peripherals\timer_group
(xxxxxは皆さまのユーザー名)
コーディングする
main.c を以下のようにコーディングします。
#include
#include "freertos/FreeRTOS.h"
#include "freertos/task.h"
#include "freertos/queue.h"
#include "driver/timer.h"

#define TIMER_DIVIDER         (16)  //  Hardware timer clock divider
#define TIMER_SCALE           (TIMER_BASE_CLK / TIMER_DIVIDER)  // convert counter value to seconds

typedef struct {
    int timer_group;
    int timer_idx;
    int alarm_interval;
    bool auto_reload;
} example_timer_info_t; // (1)

typedef struct {
    example_timer_info_t info;
    uint64_t timer_counter_value;
} example_timer_event_t;    // (2)

static xQueueHandle s_timer_queue;  // (3)

static void inline print_timer_counter(uint64_t counter_value)  // (4)
{
    printf("Counter: 0x%08x%08x\r\n", (uint32_t) (counter_value >> 32),
           (uint32_t) (counter_value));
    printf("Time   : %.8f s\r\n", (double) counter_value / TIMER_SCALE);
}

static bool IRAM_ATTR timer_group_isr_callback(void *args)  // (5)
{
    BaseType_t high_task_awoken = pdFALSE;
    example_timer_info_t *info = (example_timer_info_t *) args; // (6)

    uint64_t timer_counter_value = timer_group_get_counter_value_in_isr(info->timer_group, info->timer_idx);    // (7)

    example_timer_event_t evt = {   // (8)
        .info.timer_group = info->timer_group,
        .info.timer_idx = info->timer_idx,
        .info.auto_reload = info->auto_reload,
        .info.alarm_interval = info->alarm_interval,
        .timer_counter_value = timer_counter_value
    };

    if (!info->auto_reload) {   // (9)
        timer_counter_value += info->alarm_interval * TIMER_SCALE;
        timer_group_set_alarm_value_in_isr(info->timer_group, info->timer_idx, timer_counter_value);
    }

    xQueueSendFromISR(s_timer_queue, &evt, &high_task_awoken);  // (10)

    return high_task_awoken == pdTRUE; // return whether we need to yield at the end of ISR // (11)
}

static void example_tg_timer_init(int group, int timer, bool auto_reload, int timer_interval_sec)   // (12)
{
    timer_config_t config = {
        .divider = TIMER_DIVIDER,
        .counter_dir = TIMER_COUNT_UP,
        .counter_en = TIMER_PAUSE,
        .alarm_en = TIMER_ALARM_EN,
        .auto_reload = auto_reload,
    }; // default clock source is APB
    timer_init(group, timer, &config);  // (13)

    timer_set_counter_value(group, timer, 0);   // (14)

    timer_set_alarm_value(group, timer, timer_interval_sec * TIMER_SCALE);  // (15)
    timer_enable_intr(group, timer);    // (16)

    example_timer_info_t *timer_info = calloc(1, sizeof(example_timer_info_t)); // (17)
    timer_info->timer_group = group;
    timer_info->timer_idx = timer;
    timer_info->auto_reload = auto_reload;
    timer_info->alarm_interval = timer_interval_sec;
    timer_isr_callback_add(group, timer, timer_group_isr_callback, timer_info, 0);  // (18)

    timer_start(group, timer);  //(19)
}

void app_main(void)
{
    s_timer_queue = xQueueCreate(10, sizeof(example_timer_event_t));    // (20)

    example_tg_timer_init(TIMER_GROUP_0, TIMER_0, true, 3); // (21)
    example_tg_timer_init(TIMER_GROUP_1, TIMER_0, false, 5);    // (22)

    while (1) {
        example_timer_event_t evt;
        xQueueReceive(s_timer_queue, &evt, portMAX_DELAY);  // (23)

        /* Print information that the timer reported an event */
        if (evt.info.auto_reload) { // (24)
            printf("Timer Group with auto reload\n");
        } else {
            printf("Timer Group without auto reload\n");
        }
        printf("Group[%d], timer[%d] alarm event\n", evt.info.timer_group, evt.info.timer_idx); // (25)

        /* Print the timer values passed by event */
        printf("------- EVENT TIME --------\n");    // (26)
        print_timer_counter(evt.timer_counter_value);

        /* Print the timer values as visible by this task */
        printf("-------- TASK TIME --------\n");    // (27)
        uint64_t task_counter_value;
        timer_get_counter_value(evt.info.timer_group, evt.info.timer_idx, &task_counter_value);
        print_timer_counter(task_counter_value);
    }
}
ビルドして実行する
ビルド後、エラーがないことを確認して F5キーを押して app_main() にカーソルが来るまで待ちます。
その後、Monitor を起動し、F5キーを押してプログラムを実行します。
以下のように TERMINAL に表示されれば成功です。
Timer Group with auto reload
Group[0], timer[0] alarm event
------- EVENT TIME --------
Counter: 0x0000000000000010
Time   : 0.00000320 s
-------- TASK TIME --------
Counter: 0x0000000000004fb9
Time   : 0.00408180 s
Timer Group without auto reload
Group[1], timer[0] alarm event
------- EVENT TIME --------
Counter: 0x00000000017d7850
Time   : 5.00000320 s
-------- TASK TIME --------
Counter: 0x00000000017dcba6
Time   : 5.00427000 s
Timer Group with auto reload
Group[0], timer[0] alarm event
------- EVENT TIME --------
Counter: 0x0000000000000010
Time   : 0.00000320 s
-------- TASK TIME --------
Counter: 0x0000000000004e4c
Time   : 0.00400880 s
Timer Group with auto reload
Group[0], timer[0] alarm event
------- EVENT TIME --------
Counter: 0x0000000000000010
Time   : 0.00000320 s
-------- TASK TIME --------
Counter: 0x0000000000004e4c
Time   : 0.00400880 s
Timer Group without auto reload
Group[1], timer[0] alarm event
------- EVENT TIME --------
Counter: 0x0000000002faf0a0
Time   : 10.00000640 s
-------- TASK TIME --------
Counter: 0x0000000002fb45a7
Time   : 10.00435980 s
プログラムの概要
ESP32のタイマーにはグループ 0 と 1 があり、それぞれのグループにタイマーが2つあり、合計4つのタイマーを使うことができます。
timer_init() API
第1引数でグループを指定する
第2引数でタイマーを指定する
第3引数に設定用の構造体(timer_config_t型)をセットする
タイマー初期化用の構造体は以下の構成になっています。
typedef struct {
    timer_alarm_t alarm_en;
    timer_start_t counter_en;
    timer_intr_mode_t intr_type;
    timer_count_dir_t counter_dir;
    timer_autoreload_t auto_reload;
    uint32_t divider;
} timer_config_t;
alarm_en : アラームのイネーブル/ディセーブル
counter_en : カウンターのイネーブル/ディセーブル
intr_type : 割り込みのタイプ
counter_dir : カウンターの方向(アップ/ダウン)
auto_reload : 自動リロードのイネーブル/ディセーブル
divider : 分周の設定
タイマーのクロックソースは APB_CLK でデフォルトは 80MHz です。
この例では divider = 16 なので、クロックは分周されて 5MHz で計測することになります。
アラームの挙動
アラームが有効で、タイマーがアラーム設定値に達すると設定に応じて次の2つのアクションが起こります。
・割り込みが許可されていれば割り込みが発生する
・自動リロードが有効なら、自動的に設定されたカウント値がリロードされる
全体的な動作の概要
タイマーを初期設定してから割り込みハンドラ関数を登録し、タイマーを起動する。
割り込みハンドラ関数に来たらキューを送る。
app_main()ではキューを受け取って、printf()出力を行う。
コード各部の説明
コードに追記した () 部分の概要を説明します。
(1)timer_isr_callback_add()の第3引数に渡す構造体の型宣言
(2)xQueueSendFromISR()の第2引数に渡す構造体の型宣言
(3)キューのハンドルの型宣言
(4)カウンターの出力用関数
(5)タイマー割り込みハンドラ関数
引数を受け取ることができる
(6)引数を受け取る
timer_isr_callback_add()の第4引数をハンドラで受け取ることができる
(7)カウンターを読む
(8)キューに送る構造体の宣言
(9)オートリロードでない場合の処理
if()の中の処理がないと、定期的に割り込みが入らなくなる
オートリロードで使う方が無難
(10)キューに送る
割り込みハンドラ内なので ISRがついている
(11)タイマー割り込みハンドラからはbool値を返す必要がある
(12)初期化処理
(13)タイマーの初期化
(14)カウンターの設定
64ビット値であることが素晴らしい
(15)アラーム値の設定
64ビット値であることが素晴らしい
(16)割り込みの許可
(17)タイマー割り込みハンドラ関数に渡す引数(変数)のメモリー確保
スタック上の変数を使うわけにはいかないので、calloc()でメモリー確保している
(18)タイマー割り込みハンドラ関数の登録
(19)タイマーの起動
(20)キューの作成
(21)1つ目のタイマーを、オートリロードありで初期化。
(22)2つ目のタイマーを、オートリロードなしで初期化。
(23)キューを受け取る
(24)リロードあり、なしの出力
(25)タイマー情報の出力
(26)EVENT TIMEの出力
(27)TASK TIMEの出力
いかがでしたか?
うまくタイマーは動きましたか?
64ビットのカウンターであれば80MHzのクロックでも相当長い期間計測できます。
7311年?
計算合ってるかなぁ・・・
合っていたら、これは素晴らしいですね。
github esp32e-timer にプロジェクトをアップしましたので、よろしければご覧になってください。
( 環境: Visual Studio Code + PlatformIO + ESP-IDF Framework )